Learning Objectives
By the end of this lesson, you will be able to:
- Create, open and save Excel workbooks in the correct format.
- Understand the difference between Save and Save As.
- Turn on AutoSave and use AutoRecover to protect your work.
- Set up the page, margins, orientation, paper size and print area.
- Add headers, footers and print titles to a professional report.
- Print selected cells, active sheet or the entire workbook.
- Export a workbook as a PDF and share it safely with others.
Lesson Overview
This lesson closes the Excel Basics module. You've learned how Excel works, how to enter data and how to format it. Now you will learn how to save your work safely, open it again later, and print or share it as a professional report. These are the everyday skills you will use on every Excel file you ever create.
Introduction
A workbook is only useful if it is saved somewhere safe and can be shared with the right people, in the right format. Excel gives you several ways to do this — from a simple Ctrl + S, to AutoSave on OneDrive, to exporting a locked PDF for a customer or manager. Printing is equally important: even in a digital world, a one-page printout or a PDF attachment is often the fastest way to share a finished report.
Why Saving a Workbook is Important
A power cut or system crash can destroy hours of unsaved data. Saving protects it.
Only a saved file can be attached to email, uploaded to a drive or printed.
Save As lets you keep monthly, weekly or version-wise copies of the same workbook.
A saved workbook can be reopened tomorrow, next month or next year.
What is Save?
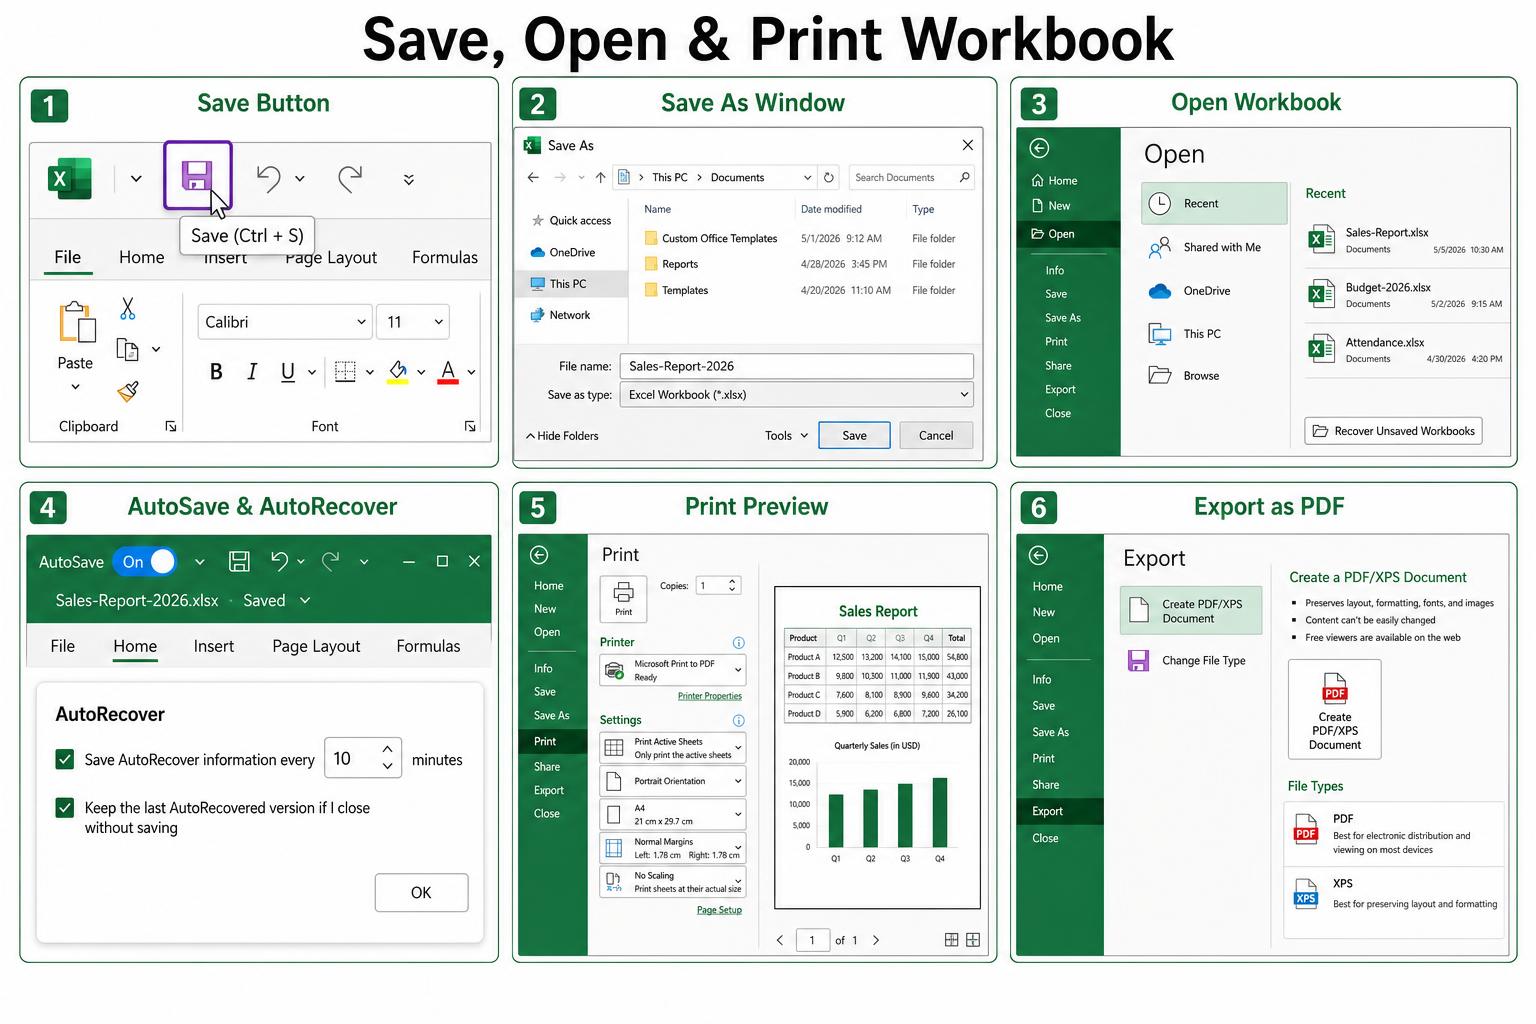
Save writes the latest version of your workbook to the same file at the same location — replacing the previous saved version. Use it constantly while you are working. The Save icon looks like a small floppy disk and lives on the Quick Access Toolbar at the very top-left of the Excel window. The shortcut is Ctrl + S.
Ctrl + S every few minutes. It takes half a second and can save you hours of lost work.What is Save As?
Save As saves the workbook as a new file — with a different name, a different folder, or a different file type (like .xlsx, .xls, .csv or .pdf). The original file stays untouched. The shortcut is F12.
Difference Between Save and Save As
| Point | Save | Save As |
|---|---|---|
| Shortcut | Ctrl + S | F12 |
| Creates a new file? | No | Yes |
| Overwrites current file? | Yes | No (original untouched) |
| Can change file name? | No | Yes |
| Can change file type? | No | Yes (xlsx, csv, pdf, etc.) |
| When to use | Every few minutes while working | For a new version, backup or different format |
Creating a New Workbook
To start with a blank sheet, click File → New → Blank workbook, or press Ctrl + N. Excel also offers templates — Budget, Invoice, Attendance, Gantt chart and many more — that you can pick from the same screen.
Opening an Existing Workbook
Click File → Open (shortcut Ctrl + O). The Open screen shows several places to look:
- Recent — the workbooks you opened most recently.
- Shared with Me — files others have shared through OneDrive or SharePoint.
- OneDrive — files saved in the cloud with your Microsoft account.
- This PC — files saved on your own computer.
- Browse — open a file dialog to pick any file from anywhere.
Saving a Workbook
The first time you save a new workbook, Excel automatically opens the Save As screen so you can choose a name and a location. After that, Ctrl + S silently updates the same file.
- 1. Press
Ctrl + Sor click the floppy-disk icon on the Quick Access Toolbar. - 2. Pick a location — OneDrive, This PC or Browse to a folder.
- 3. Type a clear file name, for example
Sales-Report-2026.xlsx. - 4. Leave the file type as Excel Workbook (*.xlsx) unless you have a reason to change it.
- 5. Click Save.
Save As (Create a New Copy)
Press F12 or click File → Save As. This is how you make backups, monthly versions or copies for other people. A common naming pattern is:
ProjectName-YYYY-MM.xlsx — for example Sales-Report-2026-03.xlsx. It sorts perfectly and never clashes with older versions.Recent Workbooks
File → Open → Recent shows the last workbooks you used. You can pin a workbook to keep it at the top of the list even after you open many other files. Right-click the file → Pin to list.
AutoSave
AutoSave is the toggle in the very top-left of the Excel window. When it is On, Excel automatically saves your changes every few seconds to OneDrive or SharePoint. You never have to press Ctrl + S — the file is always up to date.
Ctrl + S.AutoRecover
AutoRecover is a safety net. Every 10 minutes (by default) Excel silently saves a hidden copy of your work. If Excel crashes or your computer restarts unexpectedly, the next time you open Excel you'll see a Document Recovery pane on the left showing the recovered files.
Change the interval in File → Options → Save → Save AutoRecover information every X minutes. A safe setting is 5 minutes.
Recover Unsaved Workbooks
Closed Excel without saving? Don't panic. Go to File → Open → Recent and click Recover Unsaved Workbooks at the bottom. Excel opens a folder with the last unsaved versions — pick your file and press Ctrl + S to save it properly.
File Locations
Excel workbooks can live in three main places:
| Location | Good for | AutoSave? |
|---|---|---|
| This PC (Documents / Desktop) | Personal files, offline work | No |
| OneDrive | Access from any device, backups, sharing | Yes |
| SharePoint / Teams | Team files, collaboration at work | Yes |
Excel File Extensions
| Extension | Full name | Use it when |
|---|---|---|
.xlsx | Excel Workbook (default) | Normal Excel files — recommended for almost every case. |
.xls | Excel 97–2003 Workbook | Sharing with someone still on very old Excel. |
.xlsm | Excel Macro-Enabled Workbook | The file contains VBA macros that must run. |
.csv | Comma-Separated Values | Importing to or exporting from databases and other software. |
.pdf | Portable Document Format | Sending a locked, read-only report to clients or managers. |
.csv keeps only the values on the active sheet — formulas, formatting, charts and extra sheets are all lost. Use it only when a system specifically asks for CSV.Print Preview
Press Ctrl + P or click File → Print. The right side of the screen shows exactly how your worksheet will look on paper — one page at a time. Use the arrows at the bottom to move through the pages before you print anything. This one habit saves a lot of paper.
Print Settings
The left side of the Print screen has every setting you need:
- Copies — how many prints you want.
- Printer — pick your printer or 'Microsoft Print to PDF'.
- Print What — Active Sheets, Entire Workbook or Selection.
- Pages — print only certain pages, e.g. 1 to 2.
- Sides — one-sided or two-sided (if supported).
- Collated — keeps multi-page copies in order.
- Orientation — Portrait or Landscape.
- Paper size — A4, Letter, Legal, etc.
- Margins — Normal, Wide, Narrow or Custom.
- Scaling — fit the sheet on one page if it overflows.
Page Setup
For fine control, click Page Setup at the bottom of the Print screen (or open Page Layout tab → Page Setup group). The dialog has four tabs — Page, Margins, Header/Footer and Sheet — that together control every print detail.
Margins
Margins are the empty space between your data and the edge of the paper. Excel offers three presets:
| Preset | Top / Bottom | Left / Right |
|---|---|---|
| Normal | 1.91 cm | 1.78 cm |
| Wide | 2.54 cm | 2.54 cm |
| Narrow | 1.91 cm | 0.64 cm |
Page Orientation (Portrait & Landscape)
Portrait is taller than it is wide — good for lists with few columns. Landscape is wider than it is tall — good for wide tables with many columns. Change it from Page Layout tab → Orientation or directly on the Print screen.
Paper Size
Excel supports A4, A3, Letter, Legal and many more. In most of India and Europe the default is A4; in the US it is Letter. Set it on Page Layout → Size.
Scaling Options
If your table is a little too wide or too long, use Scaling to fit it neatly on one page. On the Print screen or Page Layout tab you can choose:
- No Scaling — prints at 100% (the default).
- Fit Sheet on One Page — shrinks everything to fit on a single page.
- Fit All Columns on One Page — keeps the width in one page, allows more rows.
- Fit All Rows on One Page — keeps the height in one page, allows more columns.
- Custom Scaling — set an exact % (e.g. 90%).
Print Area
A Print Area tells Excel to print only a specific range and ignore everything else on the sheet. Select the range you want, then go to Page Layout → Print Area → Set Print Area. To remove it, click Clear Print Area.
Print Titles
If your data goes onto more than one page, only the first page will have the header row by default. Use Print Titles to repeat a row (usually the header) or a column on every printed page.
- 1. Go to Page Layout → Print Titles.
- 2. In Rows to repeat at top, pick row 1 (or your header row).
- 3. Optionally set Columns to repeat at left.
- 4. Click OK.
Headers & Footers
Headers print at the top of every page; footers print at the bottom. Open Insert → Header & Footer (or the Header/Footer tab in Page Setup). Common items to add:
- Report title and company name at the top.
- Date and time — Excel updates them automatically.
- Page numbers like Page 1 of 5 at the bottom-right.
- File name or sheet name for reference.
- Confidentiality note, e.g. 'Internal use only'.
Printing Selected Cells
Highlight the cells you want to print, then press Ctrl + P. Under Settings, change the first dropdown from Print Active Sheets to Print Selection. Excel will print only the highlighted range, no matter how big the rest of the sheet is.
Printing the Active Sheet
This is the default. In the same dropdown, choose Print Active Sheets — Excel will print the sheet that is currently selected. If you have grouped multiple sheets, all of them will print.
Printing the Entire Workbook
Choose Print Entire Workbook in the same dropdown to print every sheet inside the file in one job. Make sure each sheet's Print Area, orientation and margins are set — otherwise the output can look inconsistent.
Export Workbook as PDF
PDF is the safest way to share a finished report — the layout, formatting and page breaks stay exactly as you set them, and the recipient cannot accidentally change your numbers.
- 1. Click File → Export → Create PDF/XPS Document.
- 2. Or use File → Save As and choose PDF (*.pdf) as the file type.
- 3. Click Options to choose Active sheet, Entire workbook or Selection.
- 4. Click Publish or Save.
Share Workbook
Click the Share button at the top-right of the Excel window. If the file is on OneDrive or SharePoint you can invite people by email, set them as Can view or Can edit, and even set an expiry date on the link. Files only on your PC can still be shared as an email attachment or a copy.
Real-Life Example
You have prepared a Monthly Sales Report for March 2026 with five tabs (Summary, North, South, East, West). Your manager wants a printout of the Summary tab and a PDF of the whole workbook.
- 1. Save the file as
Sales-Report-2026-03.xlsxon OneDrive. - 2. On the Summary tab, set the Print Area, choose Landscape and Fit Sheet on One Page.
- 3. Add a header "Sales Report — March 2026" and footer "Page 1 of ?".
- 4. Press
Ctrl + P, print the active sheet. - 5. Click File → Export → Create PDF/XPS, choose Entire Workbook and click Publish.
- 6. Email the PDF or share the OneDrive link with your manager.
Keyboard Shortcuts
| Shortcut | What it does |
|---|---|
Ctrl + N | Create a new workbook |
Ctrl + O | Open an existing workbook |
Ctrl + S | Save the current workbook |
F12 | Open Save As dialog |
Ctrl + P | Open the Print screen |
Ctrl + F2 | Open Print Preview |
Ctrl + W | Close the current workbook |
Ctrl + F4 | Close Excel |
Best Practices
- Press Ctrl + S every few minutes — build the habit early.
- Save important workbooks on OneDrive so AutoSave protects them.
- Use clear file names with dates, e.g. Sales-2026-03.xlsx.
- Always use Print Preview before printing on paper.
- Set a Print Area so the printout is clean, not the whole sheet.
- Repeat header rows on every printed page using Print Titles.
- Send finished reports as PDF, not editable Excel files.
Common Mistakes
- Working for hours without pressing Ctrl + S even once.
- Overwriting the original file with Save when Save As was needed.
- Saving important files only on the Desktop with no backup.
- Saving as .csv and losing formulas, formatting and extra sheets.
- Printing without Print Preview and wasting paper on unwanted pages.
- Forgetting to set Print Area — the printer wastes blank pages.
- Sending an editable .xlsx to a client instead of a locked PDF.
Key Terms
Writes the latest changes to the same file at the same location.
Saves a new copy — with a new name, location or file type.
Automatic saving every few seconds for files on OneDrive or SharePoint.
Hidden backup Excel makes every few minutes to recover after a crash.
The specific range Excel will print instead of the whole sheet.
Rows or columns that repeat on every printed page.
Dialog that controls page size, margins, orientation and scaling.
The default modern Excel file format — recommended for most files.
A plain text format with commas — used to move data between systems.
Creates a locked, read-only version of the workbook for sharing.
Remember Box
Ctrl + S while you work, F12 for a new version, and always turn on AutoSave for cloud files. Preview before you print, and share finished reports as PDF.Practice Questions
- 1. Create a new workbook, type a small sales table and save it as
Practice-Sales.xlsxin Documents. - 2. Use Save As to create a second copy called
Practice-Sales-Backup.xlsx. - 3. Turn on AutoSave (save the file on OneDrive) and change AutoRecover interval to 5 minutes.
- 4. Set the Print Area to your data range, choose Landscape and Fit Sheet on One Page.
- 5. Add a header "Practice Sales Report" and footer with page numbers.
- 6. Export the workbook as
Practice-Sales.pdf.
Quick Quiz (MCQs)
Course Complete
Congratulations! You have completed the Excel Basics course.
You've finished all 7 lessons — from opening Excel for the first time to saving, printing and sharing professional workbooks. Everything below is unlocked for you.
Chapter Summary
- Save (Ctrl + S) updates the same file; Save As (F12) creates a new copy.
- Save modern files as .xlsx unless you need .xls, .xlsm, .csv or .pdf.
- AutoSave protects OneDrive files; AutoRecover recovers files after a crash.
- Use Print Preview before printing, and set a Print Area for clean output.
- Repeat headers on every page with Print Titles; add report titles and page numbers with Headers & Footers.
- Print the selection, active sheet or entire workbook from the same Print screen.
- Export finished reports as PDF and share via OneDrive links or email.
Practice this lesson with real files
Get free practice workbooks, notes and doubt solving inside the free VIP WhatsApp community.
Join Free WhatsApp VIP Community